Hawaiian Chicken Katsu is one of those meals I make when everyone in the house is hungry, a little grumpy, and definitely not in the mood to wait. You want something crispy, cozy, and actually filling, but you also want it to taste like you put in real effort. I get it. This is my go to when I want that crunchy bite, plus a sweet and savory vibe that feels very island inspired without being fussy. And yes, I add a crunchy twist that makes people hover near the stove and “taste test” way too early.
Is Chicken Katsu Japanese?
Yep, chicken katsu is Japanese at its roots. The word “katsu” comes from “katsuretsu,” which is basically a breaded cutlet. Traditionally, you see pork katsu a lot in Japan, but chicken katsu is super common too, especially for home cooking because chicken is easy and quick.
So where does the “Hawaiian” part come in? Hawaii has a huge Japanese influence, and local plate lunch culture took Japanese katsu and made it its own. In Hawaii, you’ll usually get chicken katsu with rice, mac salad, and that signature katsu sauce that’s tangy, slightly sweet, and totally addictive. My version leans into that plate lunch feeling, but I sneak in a little extra crunch and a bit more seasoning so it doesn’t taste flat.
When I’m planning a full dinner spread, I also like having another easy chicken option in my back pocket. These air fryer herb chicken thighs with carrots are a nice “healthier but still satisfying” partner meal for busy weeks, especially if you’re cooking for people who don’t all want fried food.
What is Panko?
Panko is Japanese style breadcrumbs, and it’s the reason chicken katsu gets that shatteringly crisp coating. Regular breadcrumbs are finer and can turn a little dense. Panko is lighter, flakier, and it fries up golden with those jagged little crunchy bits.
If you’ve ever had breaded chicken that looked fine but felt kind of soggy after five minutes, panko is usually the fix. It holds onto crunch better.
My crunchy twist is simple: I toast some of the panko first. Not all of it, just a portion. It adds a deeper golden color faster, plus a nutty flavor that makes people ask, “What did you do differently?”
Quick panko tips I’ve learned the hard way:
- Buy plain panko and season it yourself. The pre seasoned stuff can taste weirdly salty.
- Don’t crush it. Those flakes are what create the crunchy texture.
- If you want extra flavor, mix in a spoon of furikake or a pinch of garlic powder.
How to dredge chicken katsu
Dredging sounds fancy, but it’s just the little assembly line that gets you that perfect crust. If your breading falls off, this step is usually why. The goal is dry surface, then sticky layer, then crunchy layer. And you want each layer to actually cling.
Here’s the simple setup I use for Hawaiian Chicken Katsu:
1) Flour
This dries the chicken and gives the egg something to grab onto.
2) Egg
I whisk eggs with a tiny splash of milk or water. Nothing wild.
3) Panko
Press the chicken into the panko. Not gently. Press like you mean it, especially around the edges.
Two small things that make a big difference:
Pat the chicken dry with paper towels first. If it’s wet, the coating gets gummy.
Use one hand for wet and one for dry if you don’t want your fingers to look like you’re wearing breaded gloves.
And if you’re making a big batch, put the breaded pieces on a rack or plate and let them sit for 5 to 10 minutes before frying. That little rest helps the coating stick better.
How to Make Chicken Katsu ;
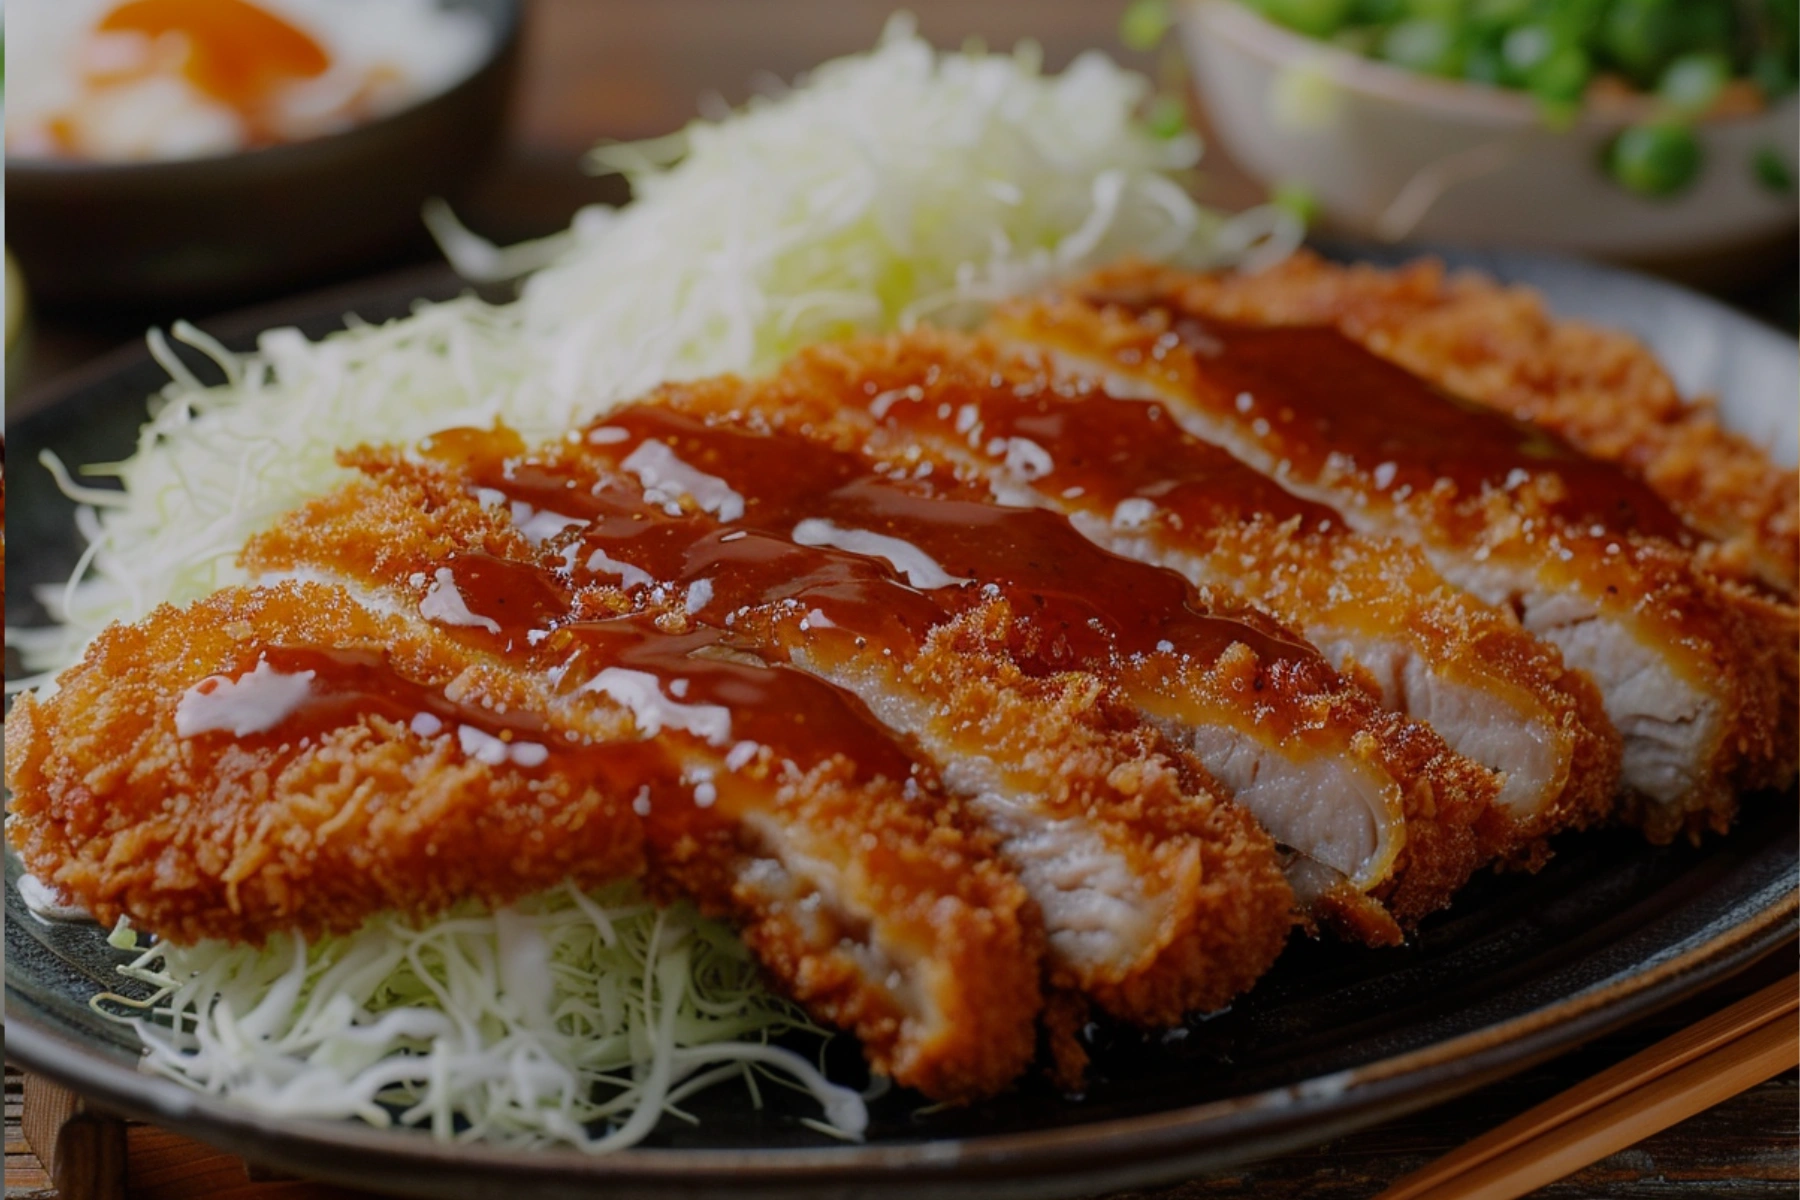
This is the part where the kitchen starts smelling unfairly good. My Hawaiian Chicken Katsu is juicy inside, crisp outside, and the sauce pulls everything together. I’ll give you the way I actually make it at home, not the “perfect studio kitchen” version.
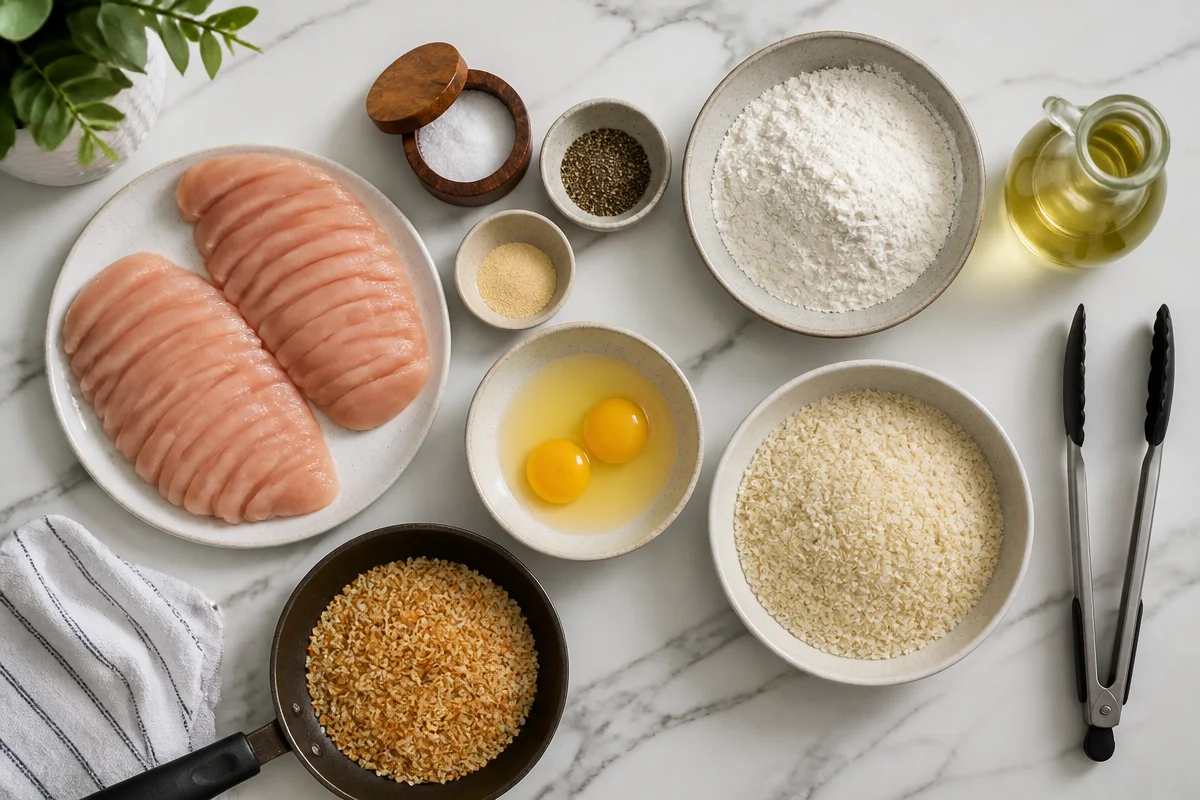
Ingredients and what you will need
I usually make this with chicken breasts because it’s classic, but thighs work too if you prefer juicier meat.
- 2 large chicken breasts, sliced into thinner cutlets
- Salt and black pepper
- Garlic powder (optional but I always use it)
- All purpose flour
- 2 eggs
- Panko breadcrumbs
- Neutral oil for frying (like canola or vegetable)
- Crunchy twist: a handful of panko toasted in a dry pan until light golden
My simple katsu sauce shortcut
If you’ve got bottled katsu sauce, use it. No shame. But when I don’t, I mix:
ketchup + a little Worcestershire + a small spoon of soy sauce + a tiny bit of sugar. Taste it and adjust. You want sweet, tangy, and a little salty.
Step by step cooking
1) Slice the chicken breasts into cutlets so they cook evenly. Season both sides with salt, pepper, and garlic powder.
2) Set up your dredge: flour on one plate, beaten eggs in a bowl, panko in another plate. Mix your toasted panko into the regular panko.
3) Coat chicken in flour, dip in egg, then press into panko until it’s well covered.
4) Heat oil in a pan over medium heat. You want it hot enough that the crumbs sizzle right away, but not so hot that they burn before the chicken cooks.
5) Fry each cutlet until golden on both sides and cooked through. I usually do about 3 to 5 minutes per side depending on thickness.
6) Drain on a rack or paper towels, then slice into strips. Drizzle sauce or serve it on the side for dipping.
“I made this for my kids and they actually asked for seconds, which basically never happens with new recipes. The toasted panko trick is genius.”
Little safety and success note: if the coating is getting dark too fast, lower the heat. If it’s pale and soaking oil, raise it a bit. You’re aiming for a steady, happy sizzle.
Also, if you’re into make ahead lunches, I sometimes turn leftover sliced katsu into a sandwich the next day. It’s dangerously good with a little shredded cabbage and extra sauce.

Serving Suggestions
This is where you can really make it feel like a full Hawaiian style plate lunch, or keep it simple if it’s a random Tuesday. I usually build plates family style so everyone can grab what they like.
Here are my favorite ways to serve Hawaiian Chicken Katsu:
- Steamed white rice with extra sauce on the side
- Macaroni salad, the classic plate lunch buddy
- Shredded cabbage with a squeeze of lemon
- Pickles or quick cucumber salad to cut the richness
- Top with furikake if you want extra savory crunch
If you want something lighter but still satisfying alongside it, a chilled salad situation is honestly perfect. This apple cranberry chicken salad is sweet and crisp in a totally different way, and it balances out the fried cutlet vibes really nicely.
One more thing: katsu stays crisp the longest if you don’t smother it in sauce right away. I like serving the sauce on the side so everyone can dip and drizzle as they go.
Common Questions
Can I bake it instead of frying?
Yes. Spray the breaded chicken with oil and bake at 425°F until golden and cooked through, flipping once. It will be a bit less crunchy than frying, but still good.
Can I use chicken thighs?
Absolutely. Thighs are juicier and more forgiving. Just flatten them a little so they cook evenly.
How do I keep the breading from falling off?
Pat the chicken dry, press the panko on firmly, and let the breaded cutlets rest for a few minutes before cooking. Also, don’t move them around too much in the pan.
What oil is best for frying?
Use a neutral oil with a higher smoke point like canola, vegetable, or peanut oil. Olive oil isn’t my favorite here.
How do I reheat leftovers and keep them crispy?
An oven or air fryer is best. Heat at 375°F until hot and crisp again. The microwave works, but the crust will soften.

A crunchy dinner you will want on repeat
If you’ve been craving that plate lunch comfort at home, Hawaiian Chicken Katsu really hits the spot without making you feel overwhelmed. Once you get the flour, egg, panko routine down, it becomes one of those recipes you can do almost on autopilot. And that little toasted panko trick gives you a crunchy twist that feels special even on a weeknight. If you want to explore another version for fun, check out this Copycat of Hawaii’s L&L Chicken Katsu Recipe or try a seasoned topping style like Hawaiian Style Chicken Katsu with Furikake. Now go make it, slice it up, and don’t be surprised if everyone magically shows up in the kitchen the second it hits the plate.
Hawaiian Chicken Katsu
Ingredients
Method
- Slice the chicken breasts into cutlets so they cook evenly. Season both sides with salt, pepper, and garlic powder.
- Set up your dredge: flour on one plate, beaten eggs in a bowl, panko in another plate. Mix your toasted panko into the regular panko.
- Coat chicken in flour, dip in egg, then press into panko until it’s well covered.
- Heat oil in a pan over medium heat. You want it hot enough that the crumbs sizzle right away, but not so hot that they burn before the chicken cooks.
- Fry each cutlet until golden on both sides and cooked through, about 3 to 5 minutes per side depending on thickness.
- Drain on a rack or paper towels, then slice into strips. Drizzle sauce or serve it on the side for dipping.
- Mix ketchup, Worcestershire sauce, soy sauce, and sugar together in a bowl. Adjust to taste.