Cheeseburger Slider Recipe nights are basically my rescue plan for those moments when people are coming over and I do not want to babysit a skillet for an hour. You know the vibe: you want something fun, hot, and filling, but you also want to actually hang out instead of cooking the whole time. These sliders are my lazy, quick answer, and they still taste like the real deal. They come out melty, saucy, and a little messy in the best way. If you have ever panicked about feeding a group, this one is for you. 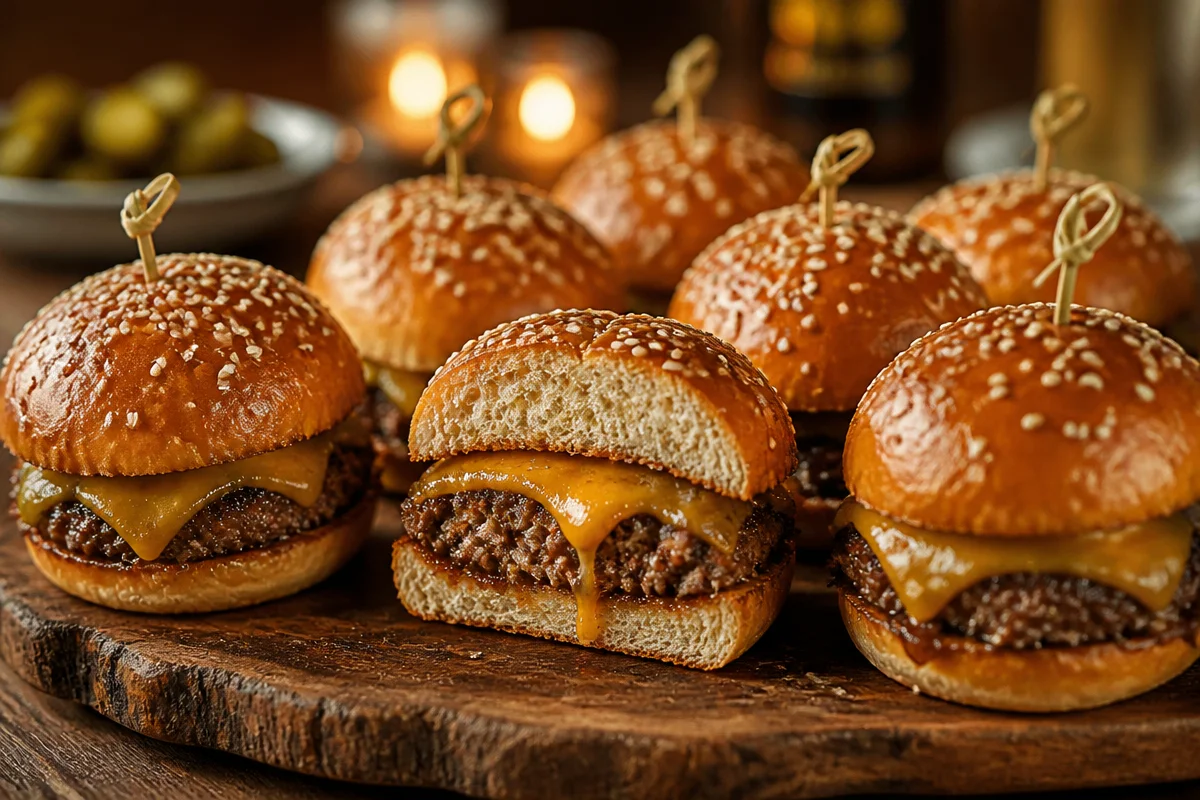
The Best Rolls for Sliders
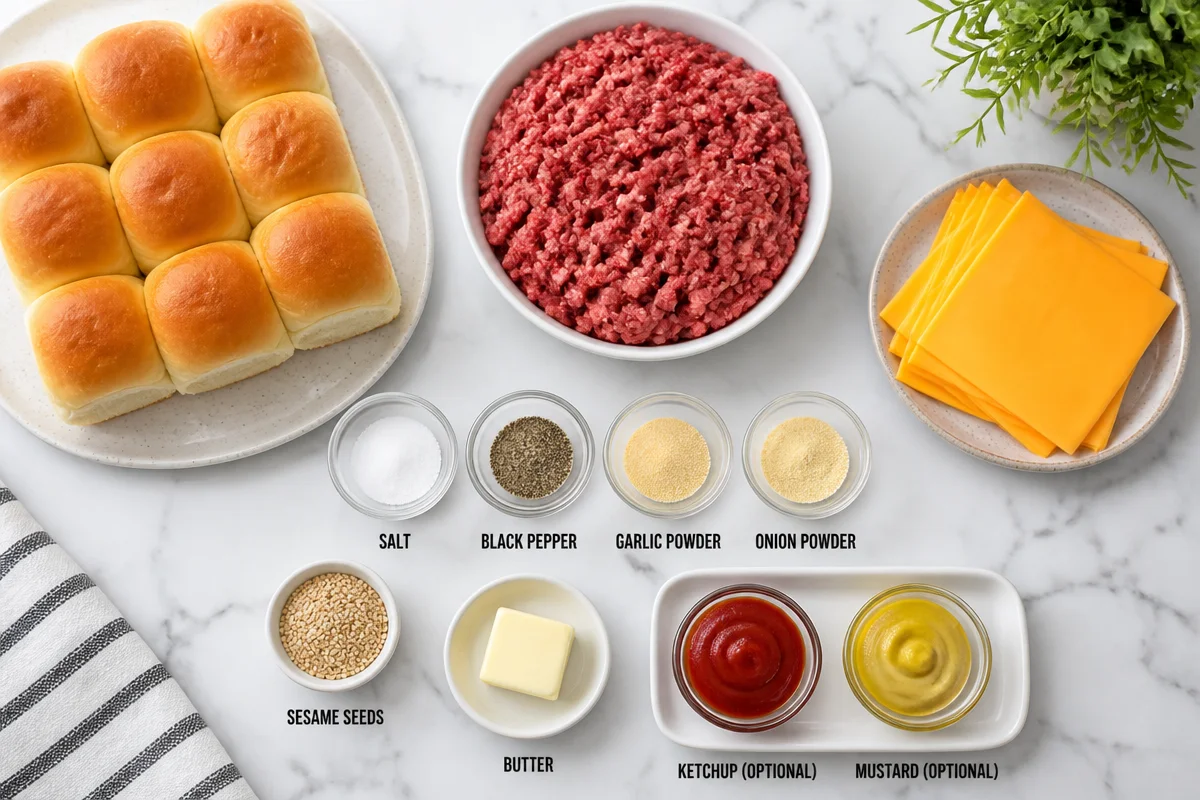
Let us talk rolls, because the bread can make or break the whole tray. I like rolls that are soft, slightly sweet, and sturdy enough to hold all the juicy beef and melted cheese. My usual pick is Hawaiian style rolls, but any soft dinner roll works if it is fresh.
What I look for in a slider roll
Here is what matters when you are shopping:
- Soft texture so they soak up flavor without feeling dry
- Even size so the sliders bake up at the same pace
- Good “tear” factor because everyone loves pulling them apart
If you want a little extra magic, lightly toast the inside of the sliced rolls before filling. It helps keep them from getting soggy, especially if you are generous with sauce (which I always am).
Also, quick side note since we are talking crowd friendly food: if you ever need a sweet breakfast or snack to balance out a savory party spread, I keep this list bookmarked: 15 best blueberry recipes. Blueberry stuff disappears fast at brunchy gatherings.
The Best Ground Beef for Cheeseburger Sliders
I keep this part simple. For a classic Cheeseburger Slider Recipe, you want ground beef that has enough fat to stay juicy, but not so much that your sliders turn into a greasy puddle. I usually grab 80/20. It is reliable, flavorful, and forgiving.
If you prefer leaner beef, you can use 90/10, but promise me you will add a little extra seasoning and do not overbake. Lean meat dries out fast, especially in the oven.
My go to seasoning is not fancy. Just salt, pepper, garlic powder, and a little onion powder. Sometimes I mix in a tiny squirt of ketchup or mustard right into the beef if I want extra “drive thru” flavor.
Cheese wise, American cheese melts like a dream, but cheddar is great too. If I am feeding picky eaters, I stick with American because it gives you that classic cheeseburger vibe with zero drama.
“I made these for game night and people literally hovered by the pan waiting for the next batch. My husband said they tasted like the best fast food burger, but homemade.”
Tips for Making Hamburger Sliders
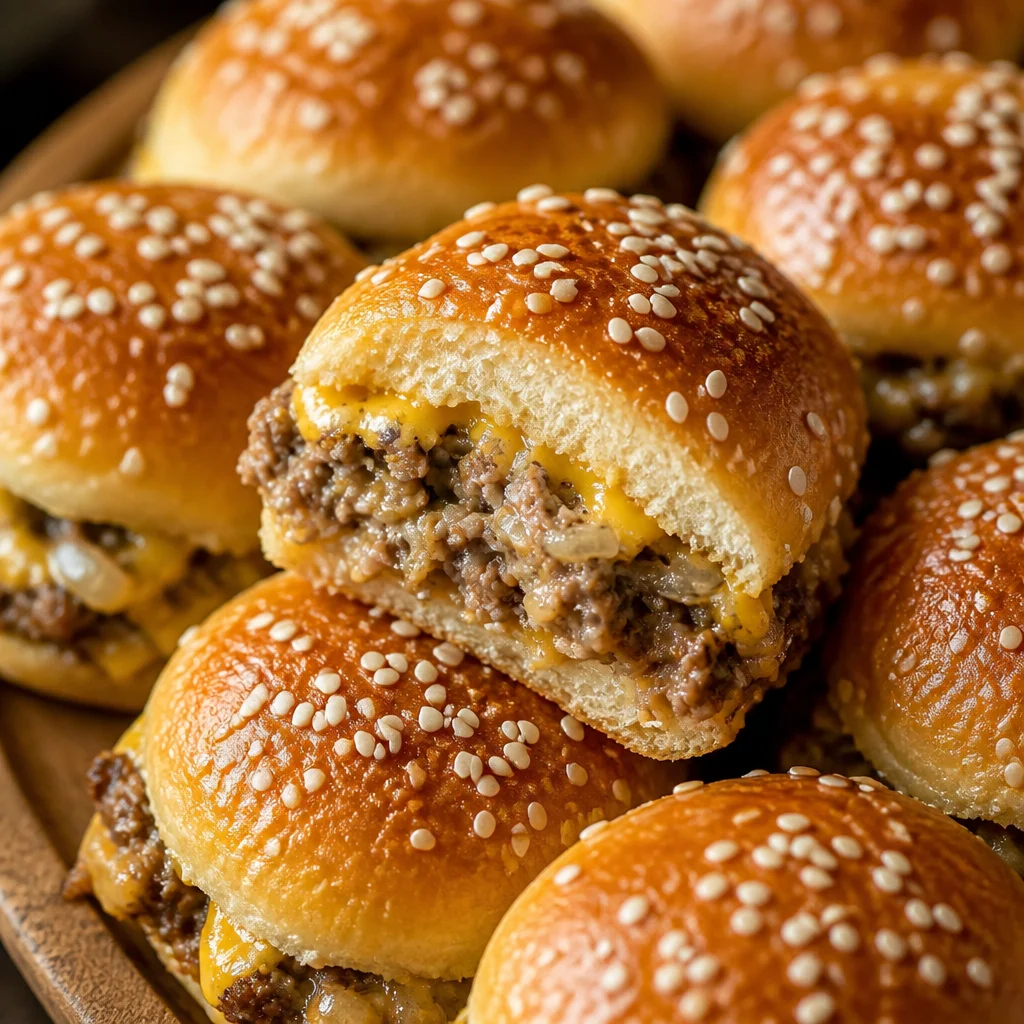
This is the part where the “lazy” method shines. Instead of shaping a bunch of tiny patties, I press the meat into one even layer, cook it, then cut it into squares. Less work, fewer dishes, and it still feels like a proper slider situation.
What you will need is probably already in your kitchen: a baking dish, a skillet (or another baking dish if you bake the meat), a spatula, and foil.
Here is my simple flow for a Cheeseburger Slider Recipe that feeds a group:
- Slice the whole sheet of rolls in half like a giant bun
- Cook seasoned beef in a single layer, then drain if needed
- Lay beef over the bottom rolls, add cheese, then the top rolls
- Brush tops with butter and a sprinkle of sesame seeds if you like
- Bake until the cheese is melted and the tops are lightly golden
My best little trick: mix melted butter with a tiny bit of garlic powder and a touch of mustard, then brush it on top. It is not required, but it makes the whole tray smell insane in the best way.
;
And do not skip resting them for about 5 minutes after baking. It helps the cheese set a bit so you can cut clean squares without everything sliding out. Well, mostly clean. They will still be a little messy, because sliders.
Can I Make these Ahead?
Yes, and honestly that is one of the reasons I love this Cheeseburger Slider Recipe for easy entertaining. You can do it a couple different ways depending on how much time you have.
Option 1: Prep earlier the same day
Cook the beef, let it cool, and store it covered in the fridge. When you are ready, assemble the sliders, bake, and serve. This is my favorite option because it keeps everything tasting fresh, but saves you from last minute cooking stress.
Option 2: Assemble ahead, bake later
You can assemble the full tray a few hours ahead, cover it tightly, and refrigerate. When guests arrive, bake it. Add 3 to 5 extra minutes since it is going in cold.
Option 3: Fully bake and reheat
It works, but the rolls soften more. If you go this route, reheat uncovered for part of the time so the tops crisp up again.
If you are building a make ahead party menu, I also like having a lighter option on the table so it is not all heavy food. I have made a few things from this list and it is great for that: 11 best pumpkin wellness recipes. Something pumpkin-y with warm spices can be a nice change of pace next to all the savory stuff.
What to Serve with Sliders
Sliders are already fun, so I keep the sides easy and snacky. Think things people can grab while chatting, and stuff that does not require a knife and fork unless you want it to.
Here are my favorite pairings:
- Pickles (dill or bread and butter, both work)
- Oven fries or frozen fries you crisp up extra
- Coleslaw for crunch and freshness
- Potato salad if you want classic cookout energy
- Veggies and dip for the people who “just want something light”
For sauces, I put out ketchup, mustard, mayo, and something spicy. Even just hot sauce is fine. If I have time, I mix a quick burger sauce with mayo, ketchup, chopped pickles, and a pinch of paprika.
Common Questions
How many sliders does one tray make?
Most packs of connected rolls make 12 sliders. For a party, I plan on 2 per person, sometimes 3 if it is the main meal and everyone is hungry.
Can I use ground turkey or chicken?
Yes. Just add a little extra seasoning and do not overbake. Poultry can dry out faster, so I usually add a bit of mayo or a splash of milk to the mixture for moisture.
What is the best way to keep sliders warm for guests?
Keep them covered loosely with foil on low heat in the oven, around 200 F. If the tops start getting too soft, uncover them for a few minutes.
Do I have to use cheese slices?
Nope. Shredded cheese works too, but slices melt more evenly. If you use shredded, pack it in a nice even layer so you do not get random bald spots.
How do I stop the bottoms from getting soggy?
Toast the bottom buns lightly, drain excess grease from the beef, and do not go wild with wet toppings inside the bake. Save things like tomatoes and extra pickles for after baking.
Wrap It Up and Enjoy Your Party
If you need a reliable, crowd pleasing Cheeseburger Slider Recipe, this is the one I come back to over and over because it is fast, comforting, and basically impossible to mess up. Focus on soft rolls, flavorful beef, and that melty cheese layer, and you are golden. If you want more slider inspiration, I have used tips from Cheeseburger Sliders (Easy, 30-min Recipe) – NatashasKitchen.com and I also like the roll baking approach from Cheeseburger Sliders Recipe (Baked with Hawaiian Rolls). Try this Cheeseburger Slider Recipe the next time you are hosting and tell me what toppings you set out because everyone has a strong opinion about pickles and I love hearing it.
Cheeseburger Sliders
Ingredients
Method
- Preheat the oven to 350°F (175°C).
- Slice the whole sheet of rolls in half horizontally.
- In a skillet, cook the seasoned ground beef in a single layer until browned, then drain the excess fat.
- Place the cooked beef evenly over the bottom half of the rolls.
- Lay slices of cheese on top of the beef.
- Cover with the top half of the rolls.
- Brush the tops with melted butter and sprinkle with sesame seeds if using.
- Bake in the preheated oven for about 15-20 minutes, until the cheese is melted and the tops are golden.
- Remove from the oven and let rest for 5 minutes before cutting into squares.