Decadent Homemade Fudge Rounds are my go to fix when I want that nostalgic lunchbox treat but with a richer, softer bite. You know the feeling, you crave chocolate, you peek in the pantry, and somehow nothing hits the spot. These come out cakey, deeply chocolatey, and sandwiched with a thick fudge filling that tastes like you actually tried, even if you are making them in a regular weeknight hurry. I started baking them because the store bought ones felt a little too sweet and a little too dry for me. If you love chocolate snacks that feel like a hug, you are in the right place.
How To Make Fudge Rounds
I am going to walk you through this like I would if you were in my kitchen and I had you holding the mixer while I cleaned up as I go. The goal with Decadent Homemade Fudge Rounds is simple: soft chocolate rounds, plus a fudgy filling, plus an optional glossy top if you want them extra pretty.
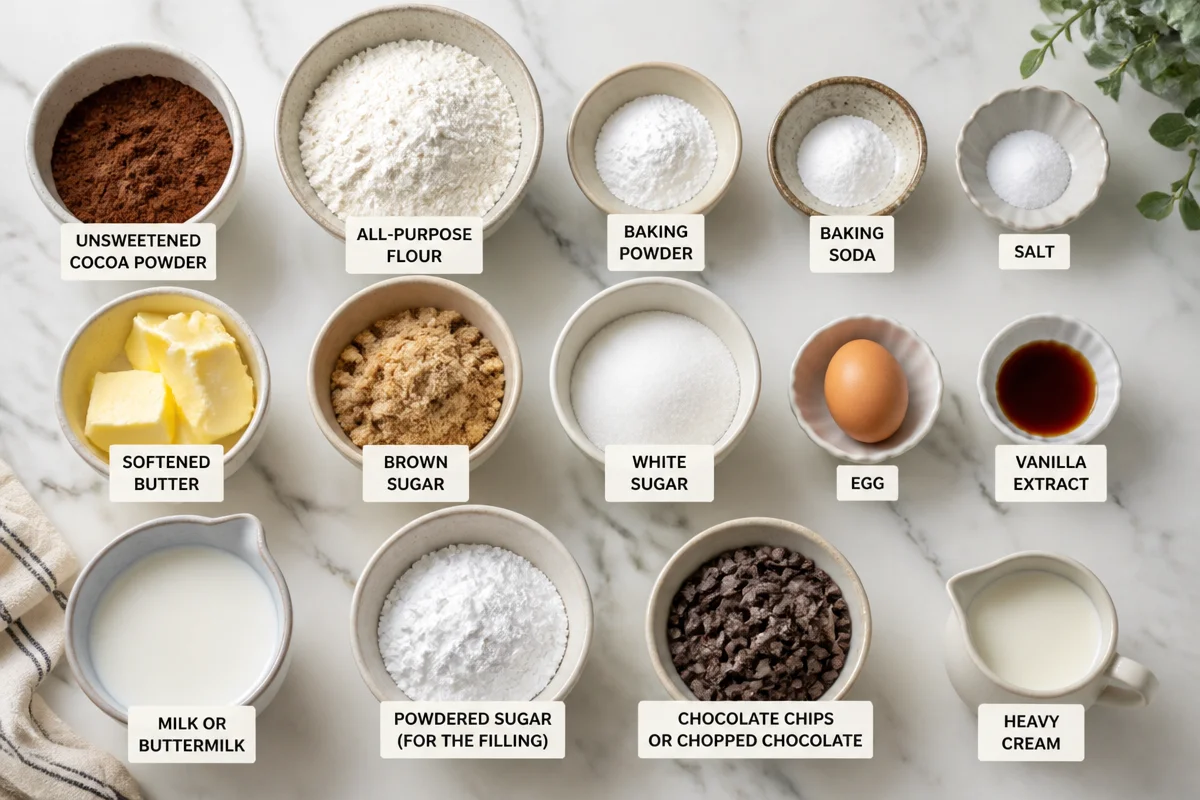
What you will need
- Unsweetened cocoa powder (for real chocolate flavor)
- All purpose flour
- Baking powder and a pinch of baking soda
- Salt (do not skip it, it makes the chocolate pop)
- Butter (softened)
- Brown sugar and white sugar
- Egg
- Vanilla extract
- Milk or buttermilk (either works)
- Powdered sugar (for the filling)
- Chocolate chips or chopped chocolate
- Heavy cream (or milk in a pinch)
Quick tip: if you are a coffee person, add 1 to 2 teaspoons of instant espresso powder to the cake batter. It will not taste like coffee, it just makes the chocolate deeper. And if you are in a chocolate breakfast season too, my Decadent Mocha Coffee Overnight Oats have that same cozy cocoa and coffee vibe.
Simple step by step directions
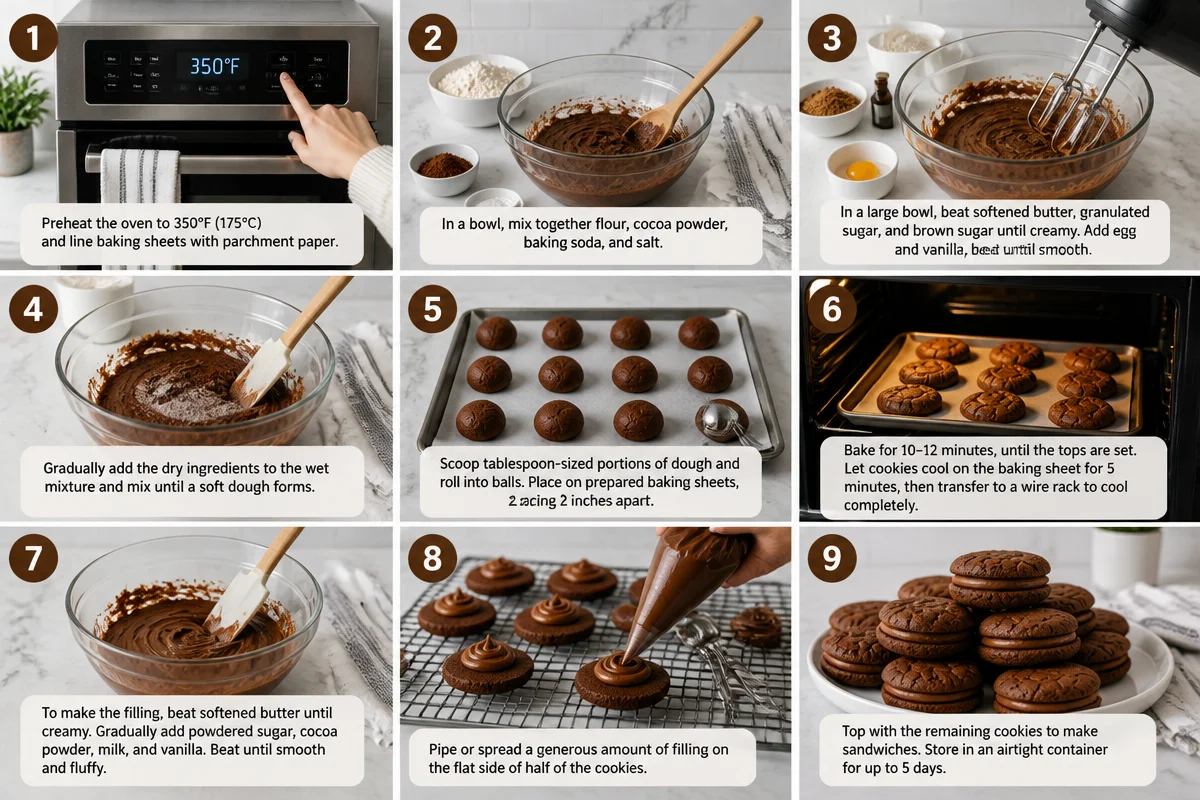
1) Preheat your oven to 350 F and line two baking sheets with parchment paper.
2) In a bowl, whisk flour, cocoa, baking powder, baking soda, and salt. This helps everything mix evenly so you do not get bitter cocoa pockets.
3) In another bowl, beat butter and sugars until fluffy. It should look lighter in color and feel creamy.
4) Beat in the egg and vanilla. Scrape the bowl once so nothing gets left behind.
5) Add the dry mix in two parts, alternating with milk. Mix just until you do not see dry flour. Overmixing can make the cakes tough, and we want them soft.
6) Scoop batter into small rounds on the baking sheet. I do about 1 to 1.5 tablespoons per round. Leave space because they spread a bit.
7) Bake 8 to 10 minutes. They are done when the tops look set and they spring back lightly when you touch them. Let them cool completely before filling.
Now the filling, which is basically the best part. Heat chocolate chips and cream together until smooth. Let it cool for a few minutes, then beat in butter and powdered sugar until it turns thick and spreadable. If it gets too thick, add a tiny splash of cream. If it is too loose, add a bit more powdered sugar.
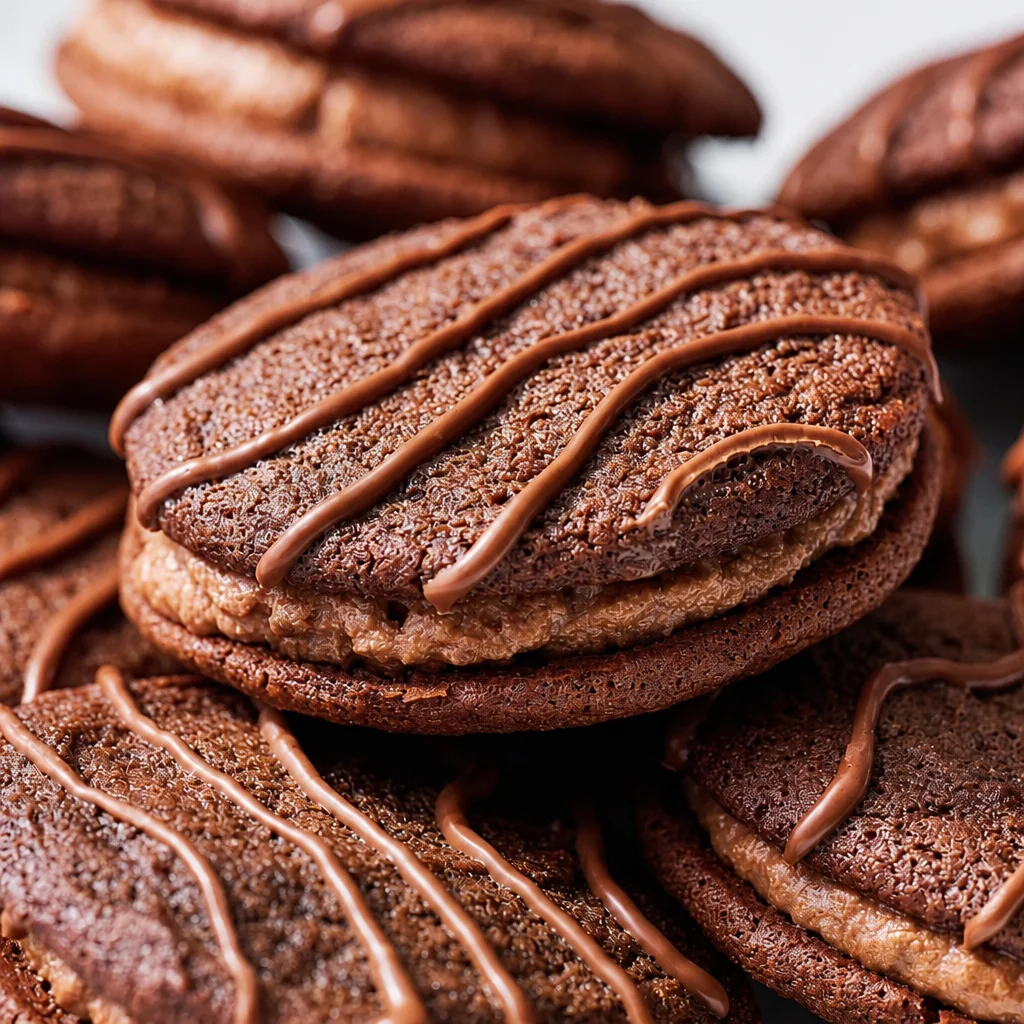
To assemble, flip half the cakes upside down, spread filling, then top with the other cakes. If you want that classic snack cake look, you can dip the tops in a little extra melted chocolate. Not required, but it is a vibe.
“I made these for my kids and my husband ended up hiding three in the back of the fridge like a chocolate gremlin. They taste better than the boxed ones.”
If your kitchen is warm and the filling feels slippery, pop the rounds in the fridge for 15 minutes to set. That small chill makes them easier to stack and pack.
How Long Are They Good For?
Decadent Homemade Fudge Rounds are best in the first couple of days, when the cake is super soft and the filling still has that creamy texture. After that, they are still good, but they start to feel a little more like a bakery cookie sandwich, which is not exactly a bad thing.
Here is what I do at home:
Room temperature: Keep them in an airtight container for up to 2 days. If your house is hot, I would not risk it with the filling.
Fridge: Store them up to 5 days. Put parchment between layers so they do not stick.
Best texture tip: If they have been in the fridge, let one sit out for 10 minutes before eating. The cake softens and the filling gets that fudgy chew again.
One more thing: if you did a chocolate dip on top, the fridge helps that coating stay snappy and neat. These are the kind of treats that make you walk by the kitchen and “accidentally” open the container again.
Can You Freeze Homemade Fudge Rounds?
Yes, and honestly, freezing is my secret weapon when I want Decadent Homemade Fudge Rounds on demand. I love pulling one out on a random afternoon and feeling like Past Me did something nice for Future Me.
Here is how to freeze them without ruining the texture:
- Let the assembled rounds chill in the fridge for 20 to 30 minutes first, so the filling firms up.
- Wrap each one in plastic wrap, then put them in a freezer bag or airtight container.
- Label with the date because time moves differently in a freezer.
How long in the freezer? About 2 months for best quality.
How to thaw: Unwrap and thaw in the fridge overnight, or on the counter for 30 to 45 minutes. If you like them extra chewy, eat them slightly chilled. It is weirdly good.
If you are making a batch for a party, you can freeze the cake rounds alone (unfilled) and make the filling fresh later. That gives you the softest bite.
More Chocolate Cake Recipes
If you are in the mood for more cozy desserts after you make Decadent Homemade Fudge Rounds, you are my kind of person. I tend to bounce between snack cakes and spoon desserts depending on the week.
When I want something warm and comforting, sticky and sweet in that “everyone goes quiet after the first bite” way, I make this: Decadent Sticky Toffee Pudding. It is a different flavor profile, but it scratches the same itch for a rich homemade treat.
And if you want to riff on these fudge rounds, here are a few easy spins:
Peppermint: Add a drop of peppermint extract to the filling and sprinkle crushed candy cane on top.
Peanut butter: Beat 2 to 3 tablespoons peanut butter into the filling. Chocolate and peanut butter are basically best friends.
Double chocolate: Stir mini chocolate chips into the batter for extra melty pockets.
If you have kids, let them “help” by spreading the filling. It will be messy, but it is the fun kind of messy, and nobody complains when chocolate is involved.
The Science of Baking
I am not a lab coat baker, but I do like knowing why things work, because it saves you from that sad moment where you pull out dry cakes and pretend you meant to do that.
Here are the simple reasons this recipe behaves:
Cocoa powder needs moisture: Cocoa dries things out, so the milk or buttermilk matters. It is what keeps the cake rounds soft instead of crumbly.
Brown sugar adds softness: It has moisture in it, so it helps the texture stay tender longer.
Do not overbake: These are small. One extra minute can take them from soft to “oops.” I set a timer for 8 minutes and check early.
Cooling matters: If you spread filling on warm cakes, it melts and slides. Cooling is not just a suggestion, it is the difference between cute sandwiches and chocolate chaos.
Once you make Decadent Homemade Fudge Rounds a couple of times, you will get a feel for your oven and your preferred thickness of filling. That is the sweet spot where baking starts feeling easy and familiar.
Common Questions
Can I make these without a mixer?
Yes. Use a whisk and a sturdy spoon. Creaming the butter and sugar will take a bit longer, but it is totally doable.
Why did my cake rounds turn out dry?
Most likely they baked too long or you added a bit too much flour. Next time, scoop flour into the measuring cup lightly and check the cakes early.
Can I use store bought frosting for the filling?
You can, but it will taste sweeter and less fudgy. If you do it, mix in a spoon of cocoa powder and a pinch of salt to make it more chocolate forward.
How do I keep them looking neat for a bake sale?
Chill them after assembling, then wrap individually. Cold fudge rounds hold their shape better when handled.
Can I make them gluten free?
Yes, use a 1 to 1 gluten free baking blend. Just know the texture might be a little more delicate, so chill before filling.
A sweet little push to bake these this week
If you have been craving a chocolate treat that feels fun and familiar, Decadent Homemade Fudge Rounds are the kind of weekend project that pays you back all week long. Keep them chilled for the cleanest layers, or freeze a few for future snack emergencies. If you want to compare methods and see other bakers’ takes, check out Homemade Fudge Rounds – Handle the Heat and Homemade Fudge Rounds – Little Debbie Copycat Recipe. Now go make a batch and promise me you will save at least one for tomorrow, because somehow they taste even better when you “forget” you made them.
Fudge Rounds
Ingredients
Method
- Preheat your oven to 350 F and line two baking sheets with parchment paper.
- In a bowl, whisk flour, cocoa, baking powder, baking soda, and salt.
- In another bowl, beat butter and sugars until fluffy.
- Beat in the egg and vanilla, and scrape the bowl to avoid missing any ingredients.
- Add the dry mixture in two parts, alternating with milk and mix until just combined.
- Scoop batter into small rounds on the baking sheet, leaving space between.
- Bake for 8 to 10 minutes until tops are set and spring back when touched.
- Let them cool completely before filling.
- Heat chocolate chips and cream together until smooth, then let cool slightly.
- Beat in butter and powdered sugar until thick and spreadable.
- If too thick, add a splash of cream; if too loose, add more powdered sugar.
- Flip half the cakes upside down, spread filling on top, and cover with the other half.
- Optionally, dip the tops in melted chocolate for a glossy finish.
- Chill assembled rounds if the filling feels slippery.